I recently purchased, (and customized...) a touring bike. Since purchasing this bike, I have made many more long trips. While most trips go smoothly, there can be an occasional hiccup. Sometimes there is nothing that can be done to prevent things going wrong and ruining your ride or your day. Sadly, most of the time there is. I ride my bike to work almost every day. Every day when I am getting ready to leave, I try to do a simple safety check to ensure that I don't either get stuck on the side of the road, or worse, have an accident.
There are a few things to go over that are quick and painless. First and foremost, tires, wheels and brakes. Most motorcycles only have two wheels, so more important than anything else is the ability to roll to a stop safely in an emergency. Check tires for wear judged by the tread wear indicator (TWI). The TWI is a bar in between the tread of the tire and when the tread wears down so that it is flush with the TWI the tire needs replacing.The location of the TWI is usually marked on the sidewall by the edge of the tread with a small arrow, triangle, or "TWI". also check for dry cracking, nails, cord showing, and tire pressure. From working in a motorcycle shop, I can tell you that at least 95% of all tires i see are under-inflated. If you doubt it, don't ride it.
Next check the brakes, grab a flashlight and inspect the edge of the brake pad. most pads have a small groove or two that is visible, when this groove is gone pads need to be replaced.
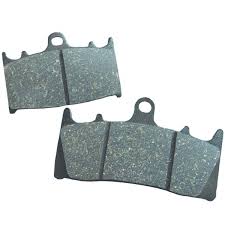
It is also a good idea to note whether the pads are the same thickness, this could indicate a sticking caliper.
As far as the wheels go, simply rolling the bike with the engine turned off may help you hear any bearing noises, and the bike should run smoothly. On spoked wheels, use a screwdriver and run it over the spokes. Most spokes should have a nice ring to them,
THEY DO NOT ALL HAVE THE SAME TONE SO PLEASE DO NOT TRY TO TIGHTEN THEM THAT WAY. If one of the spokes sounds dull or loose, check it by attempting to wiggle it with your hands. If it feels loose, tighten it
The next thing to check will be the chain/belt. Inspect sprockets for wear. On chain sprockets, the teeth should be uniform and triangular. If they appear worn on one side badly, or the tips are beginning to curve over, do not ride the bike, and replace chain and sprockets. On belt drive bikes, teeth on the cogs should appear rounded and smooth, if they are beginning to look pointy and sharp, the belt and cogs should be replaced.


When inspecting a chains, most on road motorcycles have about 1" of deflection allowance (25mm). Total deflection means if you push the chain down towards the ground, and then up towards the sky, there should be about 1" of play between the upper most point and the lower (about a half inch each way. There is usually a sticker on the swing arm with the exact specifications but 1" is a good rule of thumb. When inspecting belt tension, a special tool is needed.

The spec for the tension can be found either on the swingarm, or in the owners manual, but it is usually around 1/2" for 10Lbs. of pressure. A good idea is to adjust it properly, and then push the belt with your fingers to get an idea of the tension. I have even heard of guys using a screw driver or wrench to tap on the belt about midway to get used to the sound.
The next most important set of things to check would be fluids. Check the oil, coolant reservoir (if it has one), brake fluids, clutch fluid (if clutch is hydraulic) and of course gasoline. Don't rely on your odometer to tell you how many miles you have left, and don't rely on your fuel gauge. It is always a good idea to open the tank and slosh it around a bit. DARWIN ALERT: Do not use a lighter or any other open flame to inspect the contents of your gas tank!.
The last things to check before embarking on your journey are controls, lights, and engine. Check throttle freeplay, brake lever freeplay, clutch lever freeplay, brake pedal, and shifter pedal. Although most motorcycles are push-pull throttle cables, the throttle should snap back when released. for freeplay, it should have about an 1/8 inch rotation before you can feel cable tension. A good rule of thumb for brake and clutch lever play is to pull the lever lightly with one finger, and when there is cable or spring tension, you should be able to fit a dime between the lever and the perch. Ensure brakes are actuation properly, and releasing properly. pedals should feel comfortable to reach and actuate. On bikes with a drum rear brake, check to see if the wheel is actually locking when brake is applied. I have seen many of these out of adjustment and the pedal has little effect. Inspect headlight hi/low beam operation, taillight, running light, and blinkers. Finally, start the engine and listen for any noises out of the ordinary
before you put your helmet on there are many times that a helmet, or earphones can drown out a sound that could be a precursor to a bigger problem. Let the engine warm up and look for any signs of fluid leaks.
This seems like a lot of inspection, but in reality, it only takes about 5 minutes. Once you develop a routine, it becomes second nature. These small things can mean the difference between a great day of cruising, and a ride on a tow truck, or even worse an ambulance.
Stay safe out there and keep the shiny side up
